Friday, May 25, 2012

Natural Babyfood at home


When my little man was ready to start foods, I thought I would do what I did for the rest of my children; but this time I wasn't sure it was the right thing for my little guy.  Cereal is always what to start with isn't it?  I was so surprised when I read the ingredients in Rice cereal.  I excepted rice to be the only ingredient and it was not.  I decided right then that I was going to make my own baby food.  It was really easier than I thought and so much better for him.  I did some research and decided to start him on the GAPS baby diet with no grains for the first year or so.  The idea is to make sure the digestive system is ready to digest food. The best foods to start with are seeded and peeled vegetables.  Squashes, zucchini, broccoli, and cauliflower are great starts.  I cook them in broth for the added fats.  Animal fats are great for development and easy to digest. 


I started with yellow zucchini and a broccoli head and spoonfuls of broth.  I also will add in a fat like coconut oil or Ghee {clarified butter, I'll share how to make this soon.}  Introducing different fats is important. 


The first times I blended it very smooth.  This didn't last long before I left it a bit chunky.   Now at 7 months I have already added in unblended foods like meat and pickles.  He loves ferment carrots as well. This way of eating is traditional, something our diets have lost in the western world.   As you can see he is a happy baby!!


How do you know if your baby is ready?
Between 4-6 months of age a baby may be ready to introduce foods.  Nursing babies usually do fine until 6 months,, when bottle feed may want it sooner.  I have always waited until 6 months to start my children on foods and never used purees for more than a month or so.  Some children may seem less interested in eating or may just play with it and spit it out.  If they are nursing or feeding well, don't worry, it is just practice for them.

 Babies have a high gag to protect them at this stage. If they are interested in eating foods they will grab and try to put them into their mouth.  This may be the first indication a baby is ready to try foods.  Do some research on what you want to do for your little one and don't stress about it.  They will get the hang of eating.  Here are some places I have looked into to make decisions on how to feed my little man.
http://www.babyledweaning.com/some-tips-to-get-you-started/

Baby led weaning is teaching a baby to eat whole foods right from the start.  They are introduced to raw or cooked foods with out purees or special treatment.  No baby foods either.  I have always done a mix of purees and whole foods.  Raw carrots are great to chew on when new teeth are coming in.
I am always there to watch and make sure he is safe while eating. 

http://www.who.int/topics/breastfeeding/en/

I am sure you have heard of or seen the article that Time magazine put out on Breastfeeding.  The World Health Organization has intervened with America's views on nursing to 1 year and recommends nursing to two years.  I have enjoyed nursing and plan on nursing my guy to 2 years.  I know it has helped all of my children and am excited for the added support that hopefully will change the views of Americans about this way of feeding and nourishing our children.

Here is some more on GAPS diet http://www.gaps.me/.

Gaps is a diet that is for recovery of the gut.  I have chosen to do it for my two boys that struggle with ADHD.  I have decided to use this to start of my youngest to make sure his gut is well populated with gut flora, for proper digestion.  I love the start off for babies, but the gaps diet for children can be extreme.  It was a good choice for our family and I have seen good results from it.  Let me know if you have considered it for your children.  I am glad to share our experience with it so far.

Wednesday, May 23, 2012

Chalk Paint chair

Finally I am back to Crafting.  In  the last two weeks my little man has crawled all over, learned the stairs like a champ, and with his new two front teeth is eating more often.  Much of my day is a whirlwind just trying to complete one thing.  Though I do enjoy being a mom and am trying to slow down and just enjoy.  It does mean I just don't have the time to get to my projects.  They stare at me from the corner, stuffed in drawers, and irritating my sleep.  I spent what time I could this week, during naps, sorting and deciding what projects are the priority and would make me the most happy.  The rest are going to wait til the say I have spare time, HA!

I have to say, I LOVE CHALK PAINT!  It is my friend.  I found this tragically sad chair on the side of the road.  {Oddly, I have noticed the side of the road in our new neighborhood has many free items left out.}  I do love chairs and never have enough.  Here is a simple way to repair and update a chair.

 The finish is worn and having been left in the rain it also darken the wood. 
 Mold, {which is Oregon's state flower} Has started to grow.  Don't worry, I did treat it and primed those areas to seal it.
 Wobbly legs that need tightening.  But overall, It is in good shape and will be great for my craft table.
With a coat of off white Chalk paint by Anne Sloan. It covers so well with one coat.
 I did some sanding and added the clear wax.  Then I added a small amount of dark wax.  I used an old sock to apply it and polish the wax.  The dark wax settles in the brush strokes and corners.  {If you add the dark wax before the clear wax, it will discolor the base coat, which might be what your looking for on certain projects.}

 There is my little guys hand, trying to climb up on everything. 


I am so impressed at how good that old chair looks now.   Next time you drive by some old wood furniture on the curb,  it can become trash to treasure.

Sunday, May 20, 2012

Camping Waterproof firestarters

My boys were so excited for this weekend to go camping with their dad.  Our Oregon weather has been perfectly beautiful but there is always the chance of wet.  My son wanted to make sure he had everything he needed to make sure the fire would start.  {It just would not be camping with out hot dogs on a roasting stick and marshmallow by a fire} 
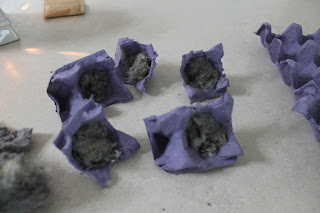
          He hand dipped each match in wax and then we made these fun dudes.  Cut the cups from the egg cartons.  Put a lint ball inside and pour wax into the cup over the lint.  This makes a great fire starter that is also water proof.  {Just when I thought I couldn't reuse lint for something useful}


They are small and easy to carry.  I also made some extra for later.  The wax soaks in, make sure to cover and let it puddle on top as well.
I am glad that I stayed home with little man.  I really am not ready for camping with a baby.  Instead I stayed home and enjoyed a quiet evening sipping hot chocolate with a spoonful of coconut oil.  It tastes amazing.  I hoping this week I might get to posting more often.  I have so many projects to get to. 
  Tricia Marie

Tuesday, May 15, 2012

Monster soup

Soup is an easy meal and very nutritious, but my boys won't eat it.  What it there was some sea monsters lurking under those vegetables would that do the trick?

I started with a turnip and butternut squash.  Both are great for carving into shapes.  Any shape will work like fish, stars, faces, and even noodles, {We are gluten free}  My boys were excited to make their shapes and it turned out to be the best soup I have made for a bit.


 I sliced it to make chips, easier to carve shapes.  My son did carve from squares.

{ Notice the lazer gun on the counter while my boys carve.}

 With the butternut squash, peel it and cut in to pieces. 

I did not get all the pictures I wanted to show the creations my boys made. They did eat it and even wanted more.

Simple soup

Half to full chicken raw
Cover in large pot with water.
Heat to boil and turn down to simmer for 1-2 hours.
This creates the broth, remove chicken and use meat and broth for soup.

Add in your favorite vegetables.
Cauliflower
broccoli
carrots
Salt and pepper to taste.


Broth is very nutritious when made with skin, bones, and meat.  It adds great fats that growing children need for their body growth and brain development. Adding in broth and soups to your children's diet is very simple and nutritious.

Linked at 


Wednesday, May 9, 2012

How to infuse oil.

I love using natural oils for my skin and for my families skin.  It is a great way to moisturize and to use for massaging. For my little man I like to use Grape seed oil and now that he is older, almost 7 months, I want to try adding some infusions.  You can infuse oil with different herbs to help treat the skin, aches, and to help relax.  It can also leave a nice scent.  I prefer using oils on my children as I know exactly what is in it.  Most of the oils are food grade and organic.  This eliminates pesticide residue and there is only  one ingredient.  Oils can be used just out of the shower,  You will be amazed at how soft your skin will be.  My baby boy has never had a diaper rash and I feel it is the oil I use to massage him. 

Start by choosing an oil.  Of course you can also use infused oil for cooking,

Olive oil
Almond oil
Grape seed oil
Jojoba oil

There are several more.  I have purchased some online and now I buy them at the grocery store in the baking isle.

Next you can choose what to infuse it with.

I wanted to use Chamomile for a relaxing affect.
 Chamomile is known to calm and soothe.  The scent is relaxing and great for soothing the skin.  It is a great tea for calming for bed.  It is not recommended for pregnant women.

Lavender is great for reducing stress and relaxing.  It works well with chamomile or on its own.  Besides, it has a great scent.

Dandelion has many great qualities for healing.  Externally used is works well in a massage oil for treating aches and pains.  This would also be a good oil to use for cooking with or making dressing. I will be making this infusion soon.  

I chose not to use Dandelion at this time, I wanted to plant some in a clean space in our yard.  Be aware of dogs and foot traffic where you cultivate it, if this is what you want to use.

A nice Chamomile mixed tea was available at New Seasons.  It has flower heads, leaves, and added mint.  This should work great for massage oil. 


I added oil to a dish and soaked the tea in the oil over several days.  I strained it through a coffee filter.  It is ready to go.

 It turns a great soft green, that how you know it is infused.  You can also set the oil and tea in the sun for 2-3 weeks to get a deeper infusion. 

Make sure to do a sensitivity test on the skin. Place a drop on the inside of the wrist. Allow it is soak in and set overnight.  If there is not reaction in the morning, than it is fine to use on little ones skin, {or any one your concerned about}.

Ideas for using your infused oil.

Massage is what I originally started with, but now that I have made it I love the smell.  I plan on using it in a salve for aches and pains, minor abrasions, and bruising.  It can be added to sugar scrubs, lip balm, and body butters.  Tonight I am started a lavender one for a sugar scrub.  All great body care items for Mother's Day.

Linked at http://www.pincushioncreations.com/
 http://savvysouthernstyle.blogspot.com/


Friday, May 4, 2012

How to make Sauerkraut

Sauerkraut is something new for me.  I have always seen it next to the condiments and only thought that much about it.  I certainly never used it or wanted to...until I found out about how good it is. Now it is becoming a staple in our home.  Sauerkraut is a Pro-biotic food.  I am sure you have seen the yogurt commercials for regulating your system.  Sauerkraut and yogurt are both Pro-biotic foods that kill off bad bacteria lurking in your digestion system, called Die off, and repopulate with good bacteria.  Fermented foods is fantastic for this.  Since different areas of your bowels have different bacteria you need to have varieties of fermented foods {Pro-biotic}.  I plan to introduce many varieties to my family and wanted to share my experience with each kind. 

Using organic cabbage and seal salt is all you need.  I decided to use purple and green for added flavor. Purple cabbage is a bit sweeter for a
I know you can add in other spices and sugar, I just want a simple, natural, and healthy food to offer my children. 

1 head of cabbage or half of each color.
1 tablespoon of salt, add more if needed.
Crock or glass toggle container.  

First shreds the cabbage as fine as you like.  Put in a large bowl with the salt and massage it by squeezing and mixing the salt in.  Let it sit in the salt for 5 minutes and press into your container.
Mine did fill my jar until I pressed it down.
 I used a potato masher to press it down.  You want the water from the cabbage to squeeze out to cover the top of the cabbage.  Set it in a dark cabinet to ferment.  
After one week open the lid, you may need to press it down again.  You want to have the top of cabbage covered or it may mold the top.  If you did not see any liquid at the top yo can add some salt water to your mixture.
After second week open the top and let the air out.  Close again.
Then open everyday to vent.  I waited for 3 weeks to use it.  The taste was developed and mild.  It can be used as little as 3 days and ferment for 3-4 weeks.  

How to introduce fermented foods to your family. 


 Adding in fermented foods should be graduate. If you have not had them regular it can cause a large die off and may make you  feel sick as the toxins exit your body.  This is called a healing crisis.   I have started adding a teaspoon of the sauerkraut juice to each meal.  It has gone undetected in my family.  I have even added it to my 6 month old foods {more on baby foods later}.   After a day or so I increase the amount of juice and then we started adding in the cabbage with the juice to top our meats.  I am surprised that I like it so much and it has greatly helped my kids with their tummy aches.   I have introduced other Pro-biotic foods that I will be showing in later posts.  


Thursday, May 3, 2012

Homemade Lavender bodywash

Having a great scent in the morning shower is always helpful in rising and shining.  Shining is not always the case, especially here in Portland.  I thought I might add some great scents that are beneficial too. 

I started with a nice glycerin soap.  It is made locally in Sherwood, Or.  I love buying fancy soaps but I never use them.  They smell great, look pretty, and everyone reaches for the liquid soap instead.  This is a great way to use up those  soaps you have laying around.

Bar of glycerin soap
1 tsp glycerin
4 drops of Tea tree oil
 10 drops or more to your liking of Lavender essential oil
2 Tablespoons of Oil {Olive oil and grape seed works well.}
Aloe Vera and Vitamin E
 1 gallon water
 I have found that using different soaps brings different results.  I always start with half the water.
 I used Meadow foam Oil, I have it on hand for some soon to be made body butter.


Add the grated soap and melt.  Then I add the rest of the ingredients and let it sit over night. 
The last Body wash I made was very liquid for many hours so I poured it in to my container.  It turned to gel overnight and was difficult to pour out.  I have learned to let it sit overnight.  This soap was still liquid in the morning.  I decided to heat it and let the liquid evaporate off.  I let it simmer with the lid off for a half hour and then let it cool.  By the afternoon it was lumpy and gel.  I then blended it with my hand blender.  It came out creamy and very nice.

I used a recycled soap bottle and added a quick label with chalk paint.  The oil in the wash does not leave a residue but does leave my hands soft and not dried out like bar soaps usually do
.
Tips:
Cheaper soaps may need more glycerin while better quality soaps may not need it at all.  It is a bit of a gamble on how much of water, glycerin, and oils.  The best thing to do is start with less water and let it set.  If it is to stiff then add in more water and blend.   I check the soap by using some to make sure I am not watering it down to much.  A smaller bar will use less water.  

Here is m first Body wash How to.   

Linked at http://www.pincushioncreations.com/ 
 http://savvysouthernstyle.blogspot.com/


Wednesday, May 2, 2012

How to make Dry laundry detergent, Homemade

It is time to make a new batch of laundry soap.  I have really liked my last batch and am excited to keep using more.  The amount of money saved on making your own is certainly worth it and it is easy!  Our family has had no sensitivities to it and it cleans great.

This is the liquid laundry soap recipe


Start with 1 cup Washing Soda and 1 cup Borax and finely  grate 1/3 a bar of soap or 1/2 cup soap flakes.  I decided to buy a box of soap flakes.  This way I avoided shaving the soap and it mixes better for a dry mixture.

Shake!!!
Stir!!!
and flip a few times while saying bibly bobbly boo....
It's like magic your done.  { bibly bobbly boo is optional though recommended.


2 tablespoons is all you need per load, increase as you feel. 
Now add a great label on a recycled bottle. Think about how much you saved.

Tips..
To boost your detergent for a dirty load you can add baking soda. or Washing soda or Borax.  All are boosters and add extra cleaning help.  Vinegar is also great for reducing odor, {I have three boys!!}  and it also reduces static cling.


Tuesday, May 1, 2012

Where oh where is my followers box?

Last night I made some minor changes to my blog template when my Follower Box disappeared and my background went purple.  I have searched for any reason why and finally I had to start using FireFox as my Internet instead of Internet explorer.  Now it is back. I mentioned it to my all and knowing Husband and he thought that I must have updated to the newest explorer version.  It also changed how it opens new windows and how it updated pages when I commented or clicked on links. 

If you check in on your blog and your followers box is gone and you get a "cross scripting"  has been stopped type of notice, you may need to switch to another Internet browser.  Although, I hope my viewers are able to see my full blog and side panel.  Let me know if this has happened to you and how you stopped it. 

Of course, I love followers, either by Google, Bloglovin, and Linky.


Faux Mercury Glass

I have been waiting to get this project going and finally it is.  I found this fantastic pear jar at the thrift store for a couple dollars, I thought it would be perfect for mercury glass.

I started with spritzing the inside with water and vinegar.  I just mixed them equally.  I shook it and had it sit for a few to let the water move around and drip down.  This creates the mottled affect.
 I wrapped the outside with plastic food wrap and taped the edge. 
I used a chrome Rustoleum spray paint.  I do not suggest using this, it does not turn out the same as the Mirror stuff at the craft store.  I just sprayed the inside with it.  It did not look quite like chrome, but it is what I had in my garage so I used it.
 I decided to spray the inside with black to make it solid.  You can skip this step if you want to use it for candles or have it be slightly transparent. 
Tips:
*Next time I do this, {and I will}, I will use the mirror effect spray at the craft store.
*I would let the drips run down more and have a better pattern.  I ended up with circles while I wanted more runs.

Otherwise I love it.

Tricia Marie

Linked to.. http://www.pincushioncreations.com/
 http://kammyskorner.blogspot.com/
 http://savvysouthernstyle.blogspot.com/